Showing posts with label CREATE. Show all posts

2.25.2013

True Chaos

Time to be real here……

Here’s my crap craft room.

chaos

All because a couple friends talked me in to switch-a-room too many months ago.

Read about that here:
Switch-A-Room
Switch-A-Room Update 1

Because it feels like I’m never home,
it hasn’t been a priority in my life to get this done.

But, my nomadic sister and her husband will be visiting
and spending the night on Friday and Saturday…
OF THIS WEEK!

That means I need to get this done…as much as possible.

I usually work well with deadlines.
So I’m hoping it will work out well!

Feel free to leave any tips and suggestions!
Or, if you are local, feel free to come over and help.
I’ll make cupcakes!  :)

At this point in time, I don’t really want to buy anything to make it happen.
I need to work with what I have.
Or donations or free finds.

Or better yet…if you are need of crafting supplies,
come on over and take stuff!
There are a few things I can’t part with.
Other than that, I’d be happy to share.


And as I quote my brother from the comment he left me on this photo on Facebook….
”Talk about (farmgirl) chaos.....”


:)

7.23.2012

Bracelet Board

Awhile back I was on the hunt for a bracelet board/holder.  

Somewhere I came across a blog that had a slab of wood, where the gal put fun knobs on it.

{Sorry I can't find it now!}

It took me a while, but I eventually got it done!

The starting point....

Finding a fun piece of blue wood from JB Knacker, in Gilbert, IA.

{Yes, I know I could paint a piece of wood a fun blue,
but this piece had some great character.}

I collected some knobs from HobLob when they were 50% off....
but had to make another trip to a different store when I changed
my mind on what colors I wanted.

Good thing they were still 50% off!

After some measuring and drilling,
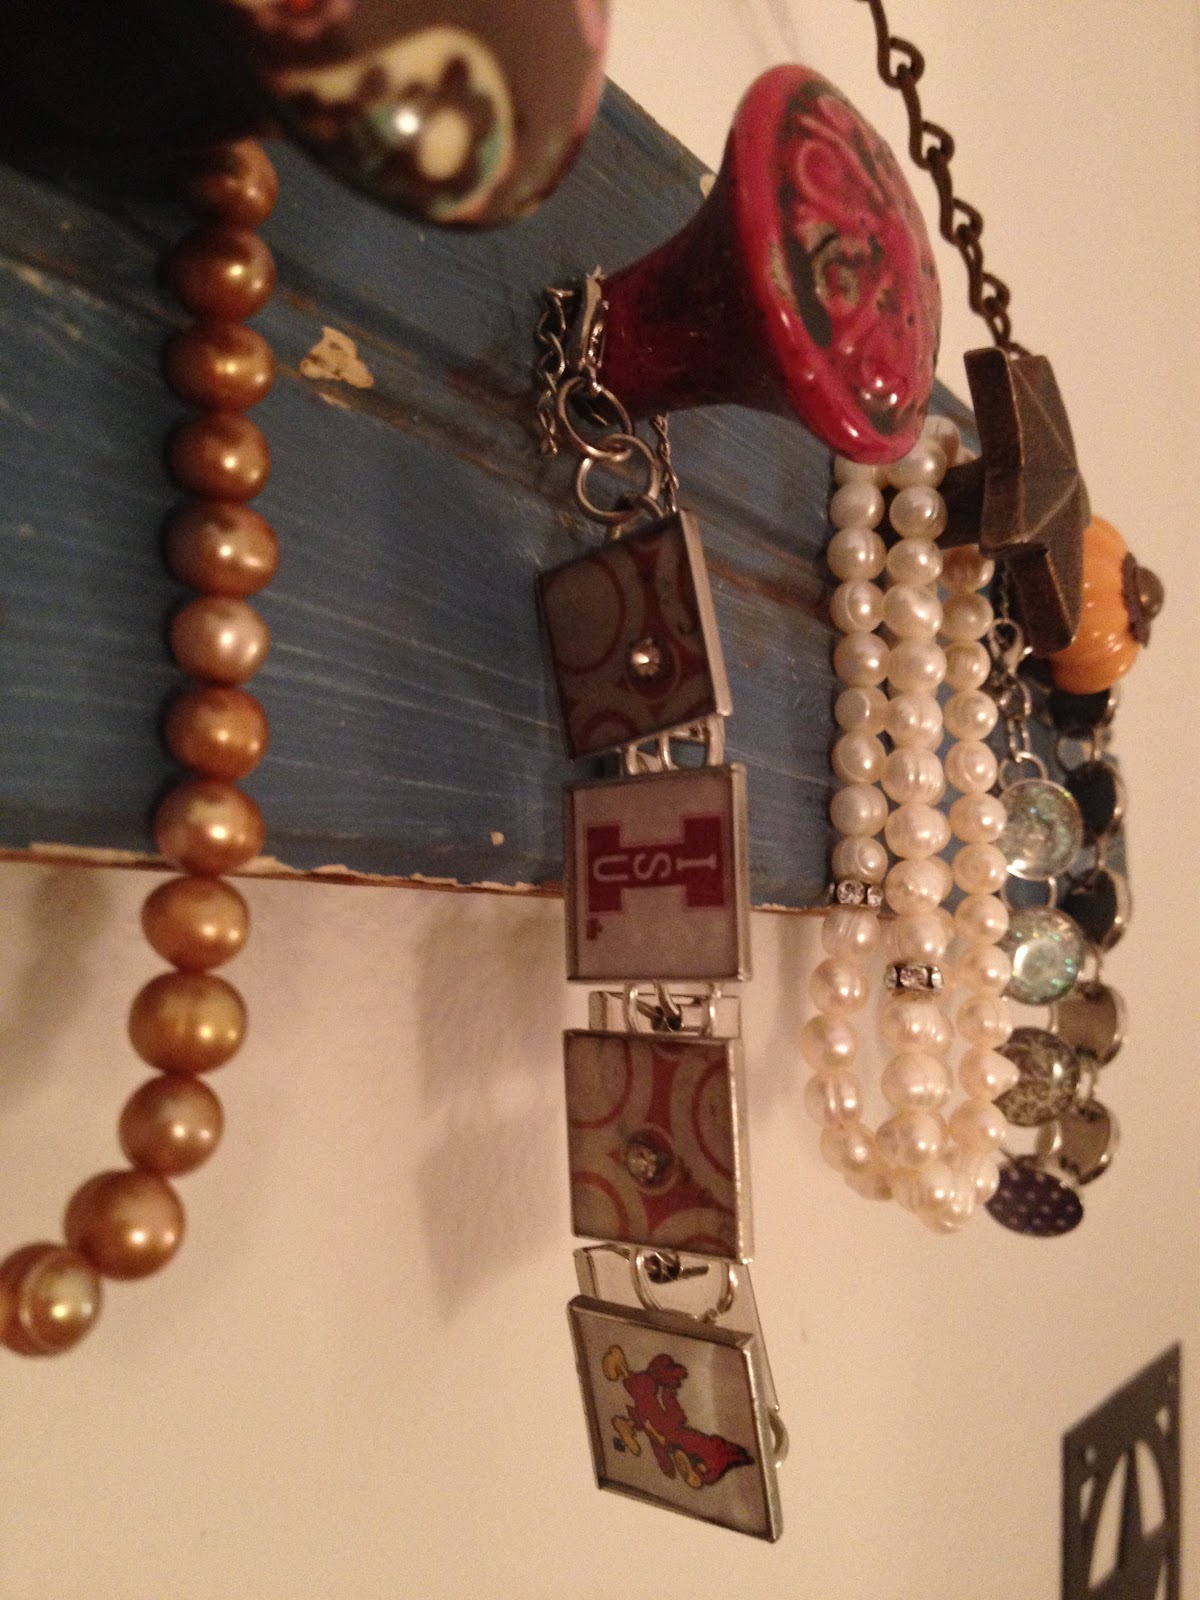
here's the finished product.

{all photos taken with my iPhone....and late at night}


Do you have any idea of how hard it is to pick out only 5 knobs from Hobby Lobby,
and not wanting to keep changing them?

I'll tell you...it's hard.

Even looking at these pictures now, I think I want to change some of them up.

Oops!


{Go Cylcones!}

Due to the knobs having a little nut on the back to hold them in place, 
the board sticks out from the wall a little bit.


But no big deal.  I just hung it up on a nail that is a little longer.


And do you notice the chain?

My dad found that somewhere in a shop while trying to find some
wire to hang the board. 


I like the look of the chain a lot more!  :)

Look at all the rusty and chippy goodness!

A look at my necklaces and bracelets...nicely organized.


The bracelets on the board were purchased from two great places.

Mama Peacock......I LOVE her stuff!!

Lather and Lace.....in addition to jewelry, fabulous lotions and things!


:)

12.14.2011

Christmas Garland

Since I never posted about this project last Christmas,
I thought I'd share it this Christmas.

Also, because I don't have any Christmas decorations up this year!
But that's what you get when you are out of state kid wrangling for one week,
busy with work the next week, then heading to the farm for over a week for Christmas.
{And getting to see my favorite little sister!!}


 To be honest, I have no idea where the inspiration for the project came from.
If it is from someone out in blogland, please let me know!

Otherwise, it must have been in my head.  :)

To start, I punched out a LOT of circles {in 3 different sizes} and 'flowers' from a coordinated set of scrapbook paper from HobLob {half price, of course!}.
To add some other texture to the piece, I also used brown kraft paper.

By the end, my hand was so sore from all the 'punching'!  But I wasn't done yet.

I then took little stacks of the circles and flowers and put a hole in the middle of them with my Crop-A-Dile.
{Which again, I got at Hobby Lobby, either half price or 40% off.}

Now it was time to string them!


Prior to this project, I purchased a BIG needle.  I have no idea what kind it is, but it was great.
The end was fairly dull, which I didn't care about.  My only concern was that I had something that would hold the jute twine in place, but would work to thread/string the cut outs.  

Oh, one thing I forgot to mention.  After I punched out all the shapes and punched the hole in the middle, I crushed/wadded up each of the pieces of paper.  I know I did more than one at a time to make things go faster. 

I did this because it gave more texture to the design in the end.  Otherwise, it just wouldn't have looked the same.  {You can tell they are crinkled in the 1st picture.}


Scrapbook paper garland {snake}

On the ends of the garland, I made loops because I used little 3M hooks to hang it.  


After I hung it up, I came up with another idea of hanging my Christmas cards from it.


Love it!  Had I actually decorated this year, I would have put some scrapbook paper on the clothespins.  
But, maybe that will happen next year.


 This was an easy craft that I did while watching movies.  
It's also one that kids could help out with.  Especially the crumpling of the paper.


One of these years, I think it would be fun to make mini garland to drape around like swags.
I would use a small circle punch only, instead of different sizes.

 What Christmas crafts have you done?

Now, if I could only get going on finishing my nephews gift!  I know he'll love it.  
I just need to {start and} finish it!

FYI....only 3 more days until I get to see my little sister!  :)

12.12.2011

Custom iPhone Cover


Today I posted at The Project Girl on how I made my own iPhone cover.

Head on over HERE to check it out!

:)

12.04.2011

Burlap Board


Lately, when I have posted, I feel as I could be playing.....
Where's Nicole?

Yesterday afternoon I arrived to my destination in Missouri.
I have the privilege of watching my cousin's 4 kiddos for the week.  

Day one has already been an adventure, bloody nose and all.  :)

Awhile back, I signed up for a Christmas Gift Exchange over at Craftaholics Anonymous.

First off, I struggled with figuring out what to make.
Then I struggled with finding time to make it.
Now, I'm struggling with getting to either a post office or a UPS store.

I'm hoping I can find the post office in town and finally get it sent!


What I finally end up making...I don't want to give up! 
{Luckily, I bought enough supplies for 2.  So I'll get to make myself one.}

Of course, I found the idea at Pinterest.  But here's the direct link.

I did use a canvas board for the base of it all.
I also found cork board that fit the exact size of the canvas board.
It was rather nice that I didn't have to cut any cork.  :)
I then used spray adhesive to attach the cork, following the directions on the can.

After I let the piece completely dry, I wrapped it in a piece of burlap, using a staple gun.

{Luckily, I have a nice neighbor/friend who lent me a staple gun.
I think I need to get one for myself!
There are so many times I could use one.}

I cut the burlap down to a size that would wrap around nicely.
That was the messiest part.  But I got it done!

I then added the upholstery tacks around the edge.
But at this point, I knew I needed to add something more, to make it more 'from me'.


 That's when I pulled out some eyelet lace, as well as mini clothes pins.
{Which I stapled to the canvas board as well.}
I added scrapbook paper to the clothes pins, both front and back.

Yes, there are lots of clothes pins.
More options that way!  
{Not to all be used at once.}

Because I was short on time, I just took all these pictures with my iPhone.  
It's my newest toy...and I'm sure having fun with it! 


The final product.....


:)


11.15.2011

Farm Boy Love!


What's better than spending the weekend at the farm?
Spending 3 full days at the farm, hanging with some cute farm boys, celebrating a birthday,
and seeing the other niece and nephews from across the river for a few hours.


Usually when there's a birthday party, a gift is a good thing to have.  :)


I have had an idea of what I wanted to make for Carson for awhile, 
but had yet to make it. 

Of course, it didn't get finished until about an hour before the party!  
Oops!


But, I think this is my favorite 'freezer paper stencil project' to date.

You can find my other projects here and here.


I can guarantee you that I WILL be making more Farm Boy shirts, 
but with a twist!  :)

Front:  {pardon the awful pictures...I was in a hurry to get it wrapped and get to the party!}
 

 The back....which totally makes the shirt 'perfect'!


If you look closely, you'll see that there is a little white outline around the tractor {and the letters as well}.
This was not intentional.
I started with trying to paint on white letters.  But even after a few layers, it looked pink.
Therefore, I had to pick a different color.  Blue it was.
The colors look great together...in my opinion.

After painting on the blue and pulling the freezer paper off,
I liked what I saw.  Blue letters with a white outline.

I'm not sure how it happened...
but I'm guessing it is from the paint drying and making the shirt shrink a bit.


And here's the birthday boy, sporting 3 of his birthday items.

1.  Styling hat.
2.  Amazing coat.
3.  Trendy Farm Boy tshirt.

{I tried to get the dude to smile...but he was too busy chattering.}

:)

9.28.2011

Craft Day #2!

It was an enjoyable time....with maybe a little crafting completed.  

:)


I decided to sleep in, this is what I saw when I finally drove up.


Chalkboard paint on some old/vintage trays. 
{One of the trays isn't painted...that's what they all looked like at first.}


Then spray painted some cans.  None of us decorated the cans while there.
But I will get mine done eventually.


 One of my main projects ended up being a button bracelet.

I had no idea it would take me as long as it did.  But oh well.

First off, I couldn't decide what to make.

Once I did finally decide, I had to figure out what I wanted it to look like.


I started with some frilly elastic I found at Hobby Lobby.  I wasn't looking for this, but sure glad I found it!
I then had to figure out the order I wanted the buttons.  That might have been the hardest part.


 Wait...nevermind.  The hardest part was sewing all the buttons on!

The frilly elastic wasn't as strong as your typical elastic.  So I had to put at least 5 knots at the end of the thread just to get started for each button.  Not fun.  But I did it.


And here are the end results.


I think I like it.

Before I was even done, I already had some ideas of what I would do differently next time.

Now, to make those ideas happen.  :)


In the end, here's a look at my projects.  {The letters are Mindy's....but I WILL be doing this as well with Scrabble tiles.}


I didn't share how the flower was made.  I didn't make it....but it's mine!
I swapped some of my fabric for Angie to make this for me.  Great trade, if I do say so myself.  :)

This craft day was greatly inspired by projects we found on Pinterest.  

Here they are.


Happy Crafting!!!

8.23.2011

Craft Day!


Today was a day of skipping work {ok....it was a vacation day}, hanging out with some fun ladies, and crafting!

Thanks to Angie over at Sunshine in the House for sponsoring and hosting our craft day!

It was definitely a great time had by all.


Just a quick background....
This day was inspired by Meg at Whatever, and her craft weekends.
However, after the input of a few gals, we had our own craft day.
Plus, most of us brought our own supplies...which means no extreme costs!
:)
The best thing about this being local...we can hopefully have these more often!
I already have some ideas to share for future craft days.


My favorite craft of the day....making a new flower for my prized purse/camera bag.


The finished product!


I decided to sew the flower.  The other ladies that made something similar to this just used a hot glue gun.  And they still turned out great!
Some ladies hard at work.


Another craft was making tile coasters.

The hardest part for me.....deciding what papers to use!


In the end, this is a look at the colors I chose.
But, I will be adding more colors.  I just need to find my tiles first!  :)


Here's a look at some of the crafts!


 My new flower on my bag.  Did I mention I love it?!  :)


 My makes...a flower, coasters, and gift tags.
 

The goods.


I can't wait until next time!  Because there will be a next time.
I just hope my work schedule will allow me to attend more.

Hey Angie....I think I might send you my work schedule!  :)


Oh, if you would like to enjoy the delicious Sonoma Chicken Salad we had for lunch, head over to Angie's blog for the recipe
Usually chicken salad scares me.  But this was delicious.  I will be making this!


What have you crafted/created lately?


8.12.2011

Marker Tin Makeover

Welcome to another product makeover.

Is it normal to get something new with the intent of changing it to fit your needs?

Well, it seems like that has happened to me lately.

Why?  Because I like the product, but don't like how it looks.


After getting some new markers awhile back, I have been on the hunt for a container to hold them.
Sadly, I couldn't find anything that wasn't cheap plastic, the size I needed, and something I wasn't embarrassed to carry.  :)

I did pick up one pencil box, but it was much to small.

In the end, I decided on this beauty.


Isn't it just lovely?

Well, maybe if I was a 7 year old!

But look at how nicely it holds my markers!


While volunteering with 4-H {to sit in a room all day to keep watch over clothes and belongings}, I decided to get rid of Tinkerbell and friends.

When I left this morning, I just threw some things in a bag...not really planning like I should have.

First up, make a pattern for the lid....with the cardboard from the new fabric scissors I brought with me.


I then cut out the pattern with my little crafting scissors.  Glad I remembered to throw those in the bag!


 I then traced the pattern on the material...with a brown pen I had in my purse.


When I cut out the material, I cut outside the line, not knowing how much room I will need to go over the edges of the tin.  I had to cover up the sides, because the Tink & gals pattern went to the sides of the lid as well.


Once I had it cut out nicely, I Mod Podged just the top of the lid, then placed the material on top.
I let that dry first.  Then I folded the material down the sides, and trimmed it up a little more, so it would look nice.
After I had it all trimmed, I cut little triangles in each of the 'corners' on the lid.
The reason for that was so when I folded the material down, I could overlap them a little to make the corners not so bulky.
I did have to trim some a little more if there was still too much material.


 I then Mod Podged one side at a time, cleaning up the excess MP as I went.


Here is me new and greatly improved marker tin.


Because this is a little tin container, I might line it with some felt or something, just to help cut down on the noise factor when I'm carrying it around with me.


 Using material to makeover a tin gives me some ideas of things I could do with all the tins that mom has at the farm.  I've seen lots of people spray paint them, which is very nice.  But I think a little pattern and texture is always nice.

I do have the intent of adding a little more to the lid.....think ruffles.

That will have to wait for another day, when I remember the glue gun.


Next time you go thrifting for tin containers or find a pencil box your niece/nephew would love, don't be afraid to have some fun with it!


 Happy Crafting!

Related Posts Plugin for WordPress, Blogger...